Welcome back to another free art lesson from Golden Road Arts. In the last lesson, Barbara Mason created leaf and flower bookmarks.
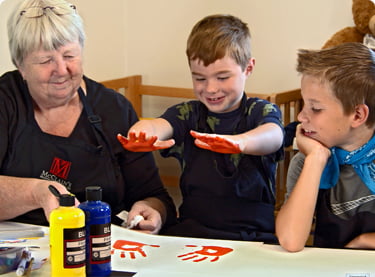
Today we will show how to color and decorate a robot template using accessible art materials. Barbara demonstrated this project to Hillsboro kids at the recent 2022 Art in the Park series.
How to Color and Decorate a Robot Design Video
Watch as Barbara Mason adds color and decoration to a simple robot picture. Follow along and add your own unique touch.
Materials Required for Creating a Robot Collage
- Robot template
- Crayons
- Googly eyes
- Buttons
- Tacky glue
- Shiny paper
Don’t forget to watch our tutorial on making leaf and flower bookmarks if you missed it.
Customize the Robot Template With Art Materials
Follow the transcript to see how Barbara takes a robot design and brings it to life. See how coloring fits into the four stages of a child’s artistic development.
Hi there, this is Barbara Mason at Golden Road Arts. Today, we’re going to do a project that we’re going to be doing in the park, just in a few days from now. And this project goes with a story. The story is about a little girl that is able to do coding. So coding is something you do in a computer, and you can make things happen. By using your computer to tell it to do things, how to perform. And I don’t know if you’ve ever looked in your computer, if you can get your mom or your dad to look it up for you. If you put in the dancing robots, you will get some real robots that actually dance, and it’s pretty funny to watch them. They must have taken many, many hours to program them to do that.
So, this story is about a robot that this young woman has coded and so we’re going to actually make a robot – we’re going to decorate him. One of our interns drew this robot for us, and you can color him pretty much any way you want. This young woman in our book, the young girl, she was so good at coding in the computer that she was able to get her robot to do things just by changing the codes. And so, there’s a lot of coding going on nowadays and it doesn’t hurt to know how to do it, that’s for sure.
So, we’re going to color our robot and you can make it any color you want. It doesn’t matter. I’m going to make his arms orange. Seems to me that in the book that they’re at the beach. I don’t know if taking your computer to the beach is a very good idea. You know, sand gets in everything. But in a book, you can do anything. It’s just like making your artwork. You can do it any way you want, and so the woman that wrote the book, she did it at the beach. When we read it at the park, you’ll see that.
So, I think I’ll make his legs down here. Now let’s see. I still have his tummy. And his feet. This is kind of a black, blue, grey. You can do these any color you want. You know this is your artwork. So, you could make a robot any way you want. Maybe I’ll color his stomach purple. I actually think this is kind of a blue. I thought this was purple, but it’s a blue. So, once we color him, you can cut him out if you want. I’m not going to cut mine out. But you could do that.
And then what we’re going to do is we’re going to stick buttons on them. Because if you were a robot and you had to do things, you would need buttons that told you what to do. So, one of the first things we’re going to do is we’re going to give our robots some eyes and we have googly eyes that we’re going to use. Everybody likes googly eyes. We just did a project in the park, and we used googly eyes. And the kids really like them. So, we’re going to use them again because they’re so much fun. So, you could do two eyes the same size. You could do one big and one small. Our sample here has one big and one small, but I’m going to do my eyes both the same size. So, I’m going to use tacky glue for gluing on the eyes because you need a little stronger glue than you do for gluing down paper, because these are heavy. There we go. We got our eyes.
Now I’ve got all this paper here. All these different papers that we’re going to use and some of these are really shiny, and you could cut them any shape you want. And I’ve got some hearts and some squares and circles. You can actually buy these kinds of circles at the Office Depot store. We’ll put a red spot on each one of his shoes. So, you can just buy these on paper, and we’ll do an orange one for his tummy. And we have some silver ones. Let’s get our glue here. Oh, that one was all used up. Well, that’s no good. There we go.
So, the nice thing about these buttons is they’re very shiny. So, we’ll do a silver one and maybe a copper one. You can put these anywhere you want. The other thing we have here is we have some punches. And these are very fun to use. I’ll get my scrap of paper here. So, these punches, the way they work is you just slide the paper in like this and then you push down. Look at that – it made it a perfect circle. This is kind of a bigger circle than we had for his tummy. So, we’ll use it. And then I have one here that’s a little bit smaller. It’s going to make a smaller circle. Oh, I didn’t get it in far enough. Well, that’s alright, a half circle was pretty cool. We use that. Put it right here. Kind of looks like a pocket, doesn’t it?
The other thing we could do is we could draw. On our sample, we’ve drawn some antennas. So, robots can have antennas to help them to get messages. Now, if you had a robot, would you want him to look like this? Would you want him to have a green neck and a blue body? How would your robot look? Let’s do some little tiny pieces here. Well, here’s some that are already cut – we’ll use these. What do you think all these little switches will do? Do you think some of them will make the robot go forward or back? Or maybe make him dance? I don’t really know. Do we know what the switches will do? If you’re a good coder, if you learn to code, you could actually make him do anything you want.
Now, these are actually sticky, so I just have to peel the back off. We’re going to give him a little heart right here. And maybe a couple more circles. Let’s do that. Little ones. We’ve got some real tiny ones here. Yeah, let’s use some of these really tiny ones. There’s a tiny blue one. This is a tiny red one. Maybe he would want an eyebrow. Do you think he may need one? He has, well, a blue nose. Well, this is looking a little different than our sample, but it’s not bad. I think I’ll make some pieces that are straight up and down like this. There we go. Maybe a slot where things go in?
So, as I said, you can do this any way you want. Your robot can have a lot of slots, or maybe it could just have a couple. It doesn’t matter because it’s your artwork. So, we hope that we’re going to see you at the park and that you’re going to read our book on coding with us and that you’re going to make a robot. One with the googly eyes, because they are a lot of fun. So now I’m going to show you the two together. I like the one with the crayon on it. It’s better, don’t you think? It’s got a lot more life to it. Okay, so we’ll see you at the park again. This is Barbara Mason at Golden Road Arts. And thanks a lot for joining me today.
Watch Free Art Instructional Lessons From Golden Road Arts
Golden Road Arts has created a library of instructional and art literacy content for children. Watch our free lessons today. You can also support us by donating or buying art from our gallery.