Thanks for joining us again for another free art lesson. If you missed our last lesson, Barbara Mason demonstrated how to make paper bag puppets.
Today we have another fun art project for young children – creating butterfly kites. Barbara demonstrated this process for the kids who joined us at the 2022 Library on the Loose summer program.
Making Butterfly Kites With Golden Road Arts Video
Discover a simple way to make a kite with easily accessible materials. Follow Barbara’s demonstration to design your own butterfly kite at home.
Materials Required for Butterfly Kites
- Butterfly outline
- Scissors
- Crayon
- Tape
- Colored tissue paper
- Kite winder
- How to Make a Butterfly Kite Template
To learn about a related art project, make sure to watch the paper bag puppet art lesson.
Creating Butterfly Kites From Scratch
Read the transcript to learn how Barbara designs a butterfly template, adds color – and then turns the design into a functioning kite. Simple art projects like these can help children start making art at home.
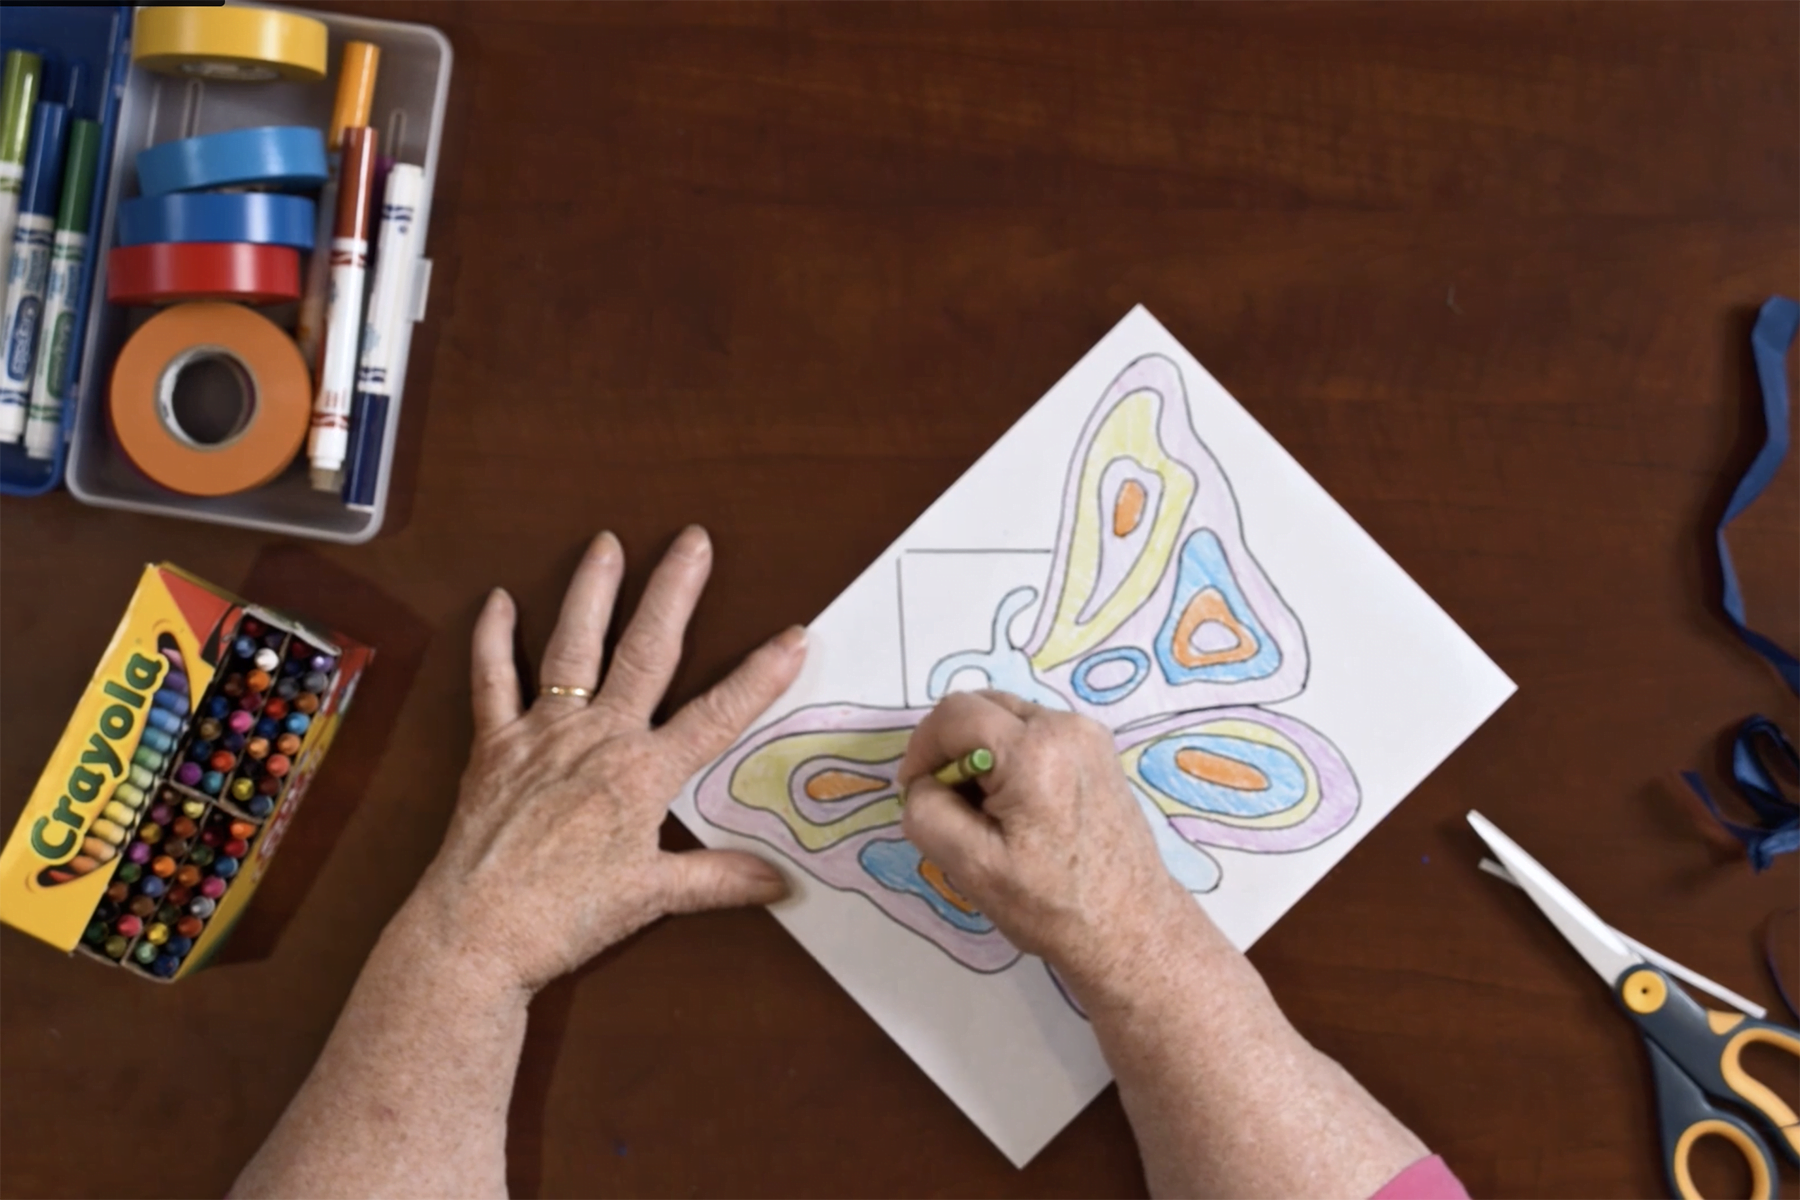
Hi there, this is Barbara Mason. Welcome to Golden Road Arts. Today, we’re going to do a really fun project. We’re going to make a kite that looks like a butterfly. So, I’ve drawn my kite on this piece of paper here, and we’re going to put the sample of this on the Internet. And we will also have a sample that doesn’t have any color on it that you can print off and make your own kite.
But what we’re going to do today is we’re going to finish coloring this now. I’ve colored this so that this side and this side look exactly the same. Because when you see a butterfly, if you look at the left side and the right side, they do look exactly the same. And so, we want to try to make our butterfly look as good as we can and what is the reason they have these little dots? A lot of butterflies have these little dots on them, and they look kind of like eyes and we think that is the reason that they have these spots on them; it looks like eyes to keep predators – which would be somebody who wanted to eat and kill a butterfly – to leave them alone because if you saw this eye in the jungle, you might think, I’m not going after that.
Look at those eyes. That might be a something evil that’s going to eat me. So, what I’m going to do is I’ve got to color these two spaces and these two spaces. And I’m thinking I want something; with something really bright there that I haven’t used, maybe green, I haven’t used green. Maybe bright green. So, we’ll just start here, and we’ll color this. Now when you do your butterfly, you can color it anyway you want, and you don’t have to make both sides exactly the same because it’s your artwork and it’s your kite. So, you can do it however you want.
And so, there are a lot of different ways to color. You can just scribble it on like I’m doing. If you want it to look really smooth, you can do little tiny circles like this. And it looks very smooth when you do that. When you cover the whole thing with little circles, and sometimes it’s easier to stay in the lines and to stay in a small area if you use little circles, it just makes it easier to control it. So, we’re finishing up our green. I’m going to do both sides the same because I want this to look pretty much like a real butterfly.
There are millions of kinds of butterflies. If you look on the Internet and you type in butterflies, you’ll see butterflies from Oregon. And then you’ll see butterflies from other parts of the country, and you’ll see butterflies from other countries. You’ll see butterflies from the jungle. They have some amazingly beautiful butterflies. Amazing, just beautiful, beautiful wings they have. So, you’ll be able to look at all the different ones and get some ideas on how you want to color your butterfly because, you can color it as I said any way you want because it’s your artwork. That’s a good thing about art. There’s not really any way to do it wrong, except if you don’t do it.
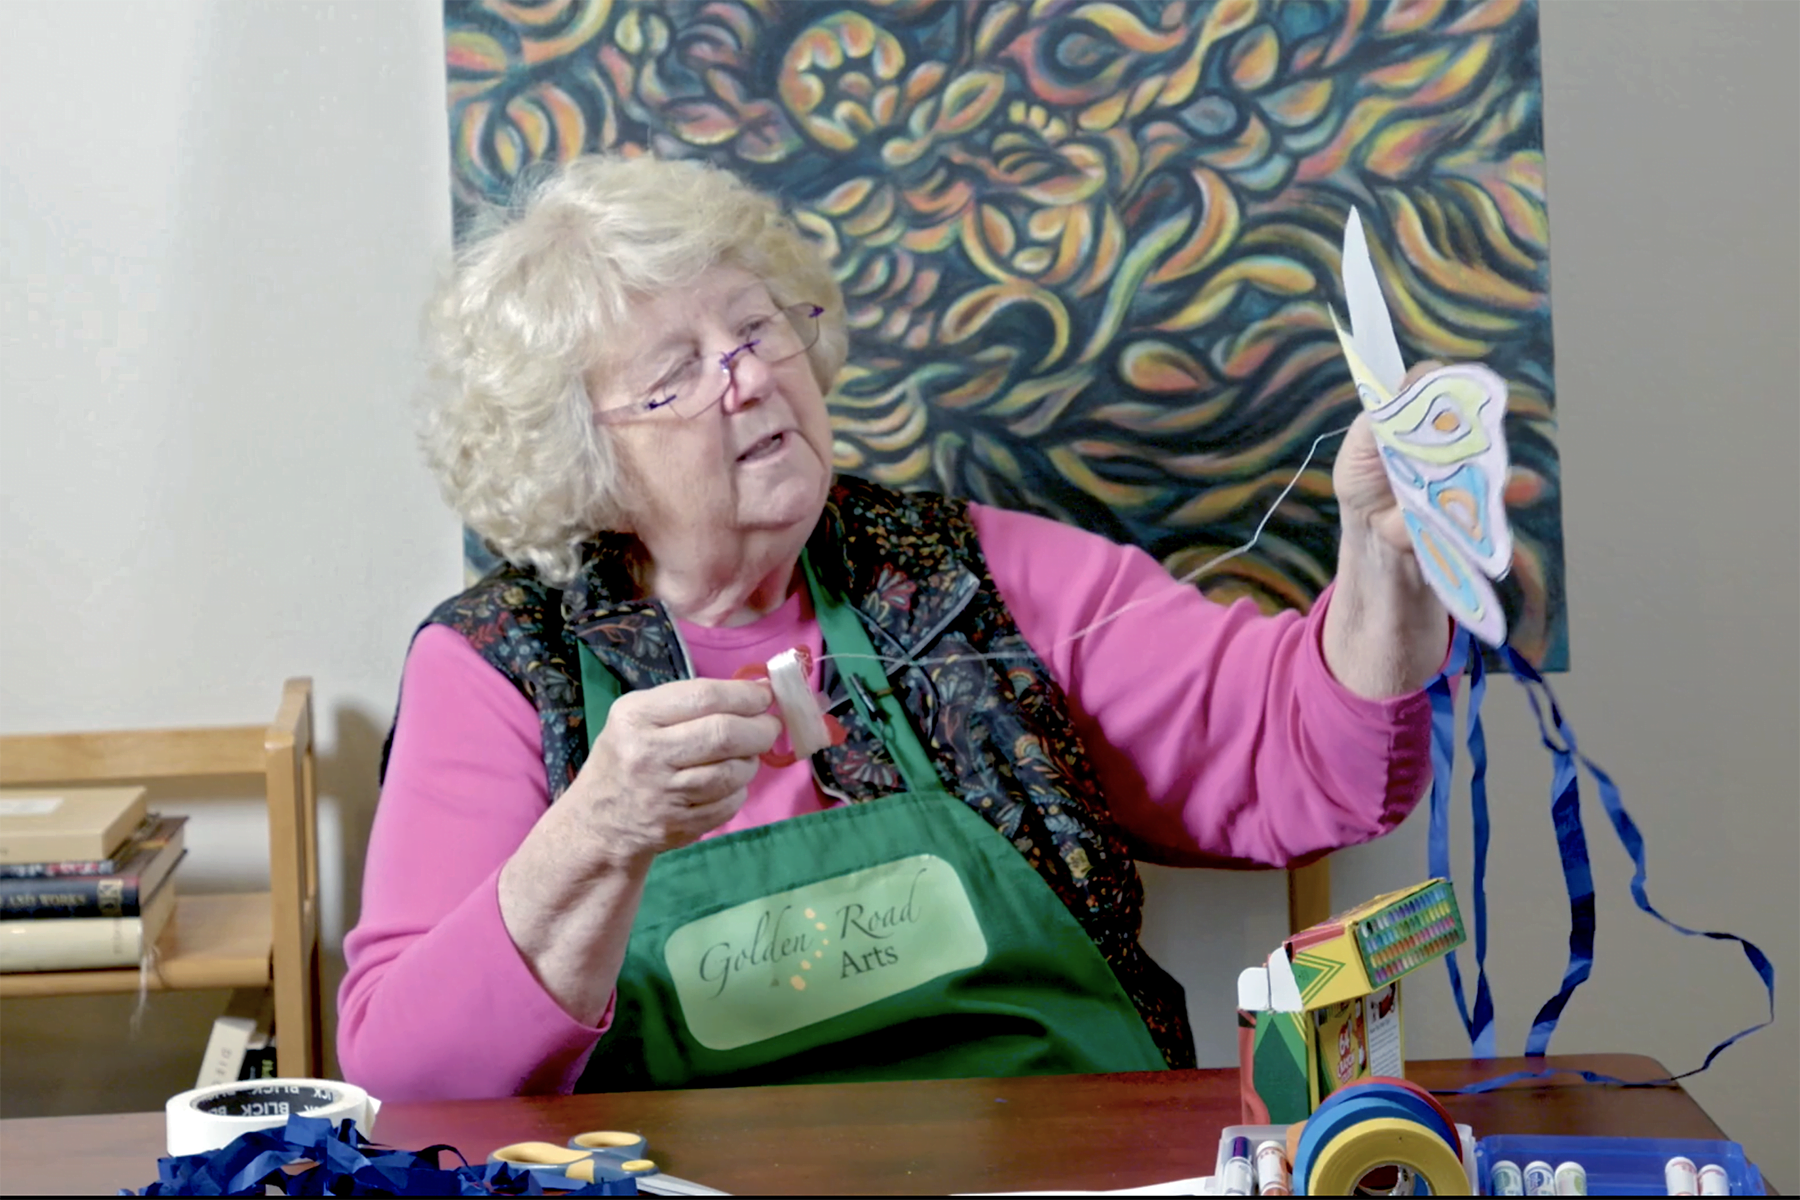
Now I left this little part right here and I think I’m going to color that yellow and I left that because I think that’s going to make it fly better. So, I left that part. It’s not really part of the butterfly, but nobody will know but us. So, we’re going to make it yellow. It just makes the shape better. You know, kites need to be a certain shape to fly, and then the other thing they need to fly is they need to have a tail. So, the tail is really important. So now we’re going to cut our kite out. We’re just going to cut all around the outside line.
So, if we have time before we see you – because we’re going to do this project at the park during the summer – we’re going to cut these out for you because it takes a long time to cut them out, and it takes a long time to color them. And so, our goal is for you to get done so that you can fly your kite. You could fly it without coloring it, but it’s a lot more fun to color it, and the other thing that we want you to do is to write your name on the back, because even though you colored it yourself, it could look a lot like someone else’s, and so we want to make sure that you get your own because you don’t want to lose your work. OK, so we’re coming around the edge here. I’m almost done.
Now a lot of times when you do a kite, you’ll see that there’s only one tail and it’s right in the middle. But because this is a butterfly kite and because it has these two wings that come down, we’re going to put two tails on it, and we’re going to put one on each side of our wing on the outside. So, we’re going to take these and one of the things we’re going to do is we’re going to scrunch these up because what happens when they’re scrunched up like this is it makes them catch the wind better. So, we’re going to take maybe two of these on each side. We’re going to put it right here at the end of wing.
So, we’re just going to take a little piece of tape. We’re going to make sure we get both of them, and we’re going to tape it on. And where can I tape two more? There’s two that are together. Again, we want to crunch these up. We’re going to take our tape and we’re going to do the same thing. We’re going to put it right here.
Now, in order to make this kite fly, there are two things that make kites fly – how fast your pull it, and how much air is underneath it. And in order to make it fly really well, you notice that there’s a spot right here. There’s a little dot right there. Well, right there, where that dot is, where we’re going to put our string. So right on the other side of that dot right here. We’re going to take a twist tie and we’re going to tape it on because that twist tie is going to help this be the right shape to fly. So, we’re just going to take a piece of tape. We will put the twist tie on the tape that might work better. We’re going to want it over the dot. I want it right onto the dot. So, we’re going to put it right here. And then what happens when we fold it? When we fold it like this you can see all of a sudden it isn’t flat anymore, it arched or curved, and so that’s one of the things that’s going to really help it fly up in the air is that curve.
And then what we have here is a kite winder. We bought these on the Internet. And they come probably from China, but I’m not sure. Maybe Japan. And we’re going to try to find the beginning of this string. And there’s a little knot in it. Then what we’re going to do when you undo this, if you can see right here on the end of the kite thing, there’s a little spot right there. And so, what we’re going to do is we’re going to take our kite string, and we’re going to pull it through that. And the reason we want to do that is because we don’t want all the line to come out. We just want a little bit to come out because if you let all the line out, then you have a big mess and it’s hard to put it back together to roll it up.
So now what we’re going to do is we’re going to make a little tiny hole. With the very point of the scissors just a little tiny hole right here. And then we’re going to take our string and we’re going to put it through that hole. Sounds like this would be hard, but it’s really pretty easy. And then what we’re going to do is we’re going to tie a big knot in it. But also, I think we’re going to put a piece of tape on it just to make sure it doesn’t come out. So now we have our beautiful butterfly. And we have our string, and we have our kite. So now when you go out in the yard or in the field and you unwind your string a little bit and you get your kite out there and you pull it behind you, this kite is going to fly up in the air. That’s going to be a lot of fun to fly your kite.
OK, so I want to talk a little bit about our kite winder string here. This comes with a with a long string and as you can see if you unwound it, it would be really long, and so right here on the edge there’s a little place on both sides. Right here and you can take your string and you can just pull it through right there, so see how it’s how it’s stuck through there now and now it won’t unwind, so it’ll only unwind a little bit. If you wanted to unwind it, you pull it out and you can unwind a little bit and then you can put it back through there. And that’ll keep it from getting longer than you want it to be because you only want it to be a certain length. You don’t want to trip over it, and you don’t want to have it longer than you need. And so, as you get your kite up in the air, you can get make the string longer. But when you’re just pulling it around, with you, you want it pretty short.
These are great kite wonders, and we got these on the Internet where you can get everything, so I hope I’ll see you at the park this summer and that we’ll be making kites together. Thanks a lot for joining me at Golden Road and we’ve got lots of projects for you this summer at the park, so I hope we’re going to see you many times. We’re going to be there at 11 on Tuesdays and at 5:30 on Thursdays, so I just look on our website or get one of our postcards and we’ll see you at the park.
Access Free Instructional Art Lessons and Art Literacy Guides
Barbara Mason has created a library of free art lessons aimed at elementary and middle school children. Our online and in-person lessons help kids build a foundation in art and the creative process. To see for yourself, watch our free art lessons today.
You can also support us by making a donation or buying art from the Golden Road Arts gallery.