Artist and printmaker Barbara Mason demonstrates the importance of lines and shapes in art in this simple lesson. Students will learn how lines are used to create all kinds of shapes and designs. In addition, there is a lesson on how to create a small display folder for use as a keepsake or classroom display.
Learn to Draw Lines and Shapes Video
Watch as Barbara draws various lines that form the basis of shapes and objects. Find out how lines change when you add color to them.
Materials Needed for How to Create Art With Lines and Shapes Art Lesson
- Computer paper
- Scissors
- Pencil
- Crayons
- Construction paper
- Markers
Create Multiple Art Projects and a Display Using Lines and Shapes
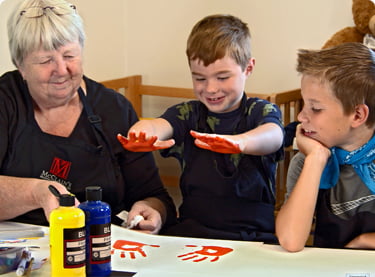
Follow along with Barbara using the video transcription below as you learn about lines and shapes, and how they can be used to create multiple art projects.
Good morning, I’m Barbara Mason, an artist and printmaker and welcome to Golden Road Arts. We’re going to talk about lines. And lines are amazing. They all have names. I know that we probably don’t think about them having names, but they do. We have our vertical lines, our horizontal lines, our diagonal lines, our curved lines, our bent lines and our broken lines which would be like a dotted line.
So, the project we’re going to do today is we’re going to make a little display book and so in order to do that I have cut these little pieces of paper four inches square on the paper cutter which is if you have that a have that done ahead of time for your class it makes it so much easier. This is computer paper, so if you want to fold it and cut it, you can do that. So, you fold it into thirds like this and then you just can cut it, fold it in half. And then cut it on the scissors and that works as well. It’s not quite as sharp, but it certainly will work just fine.
So, I’ve got these pieces cut, so the first thing we’re going do is we’re going take a pencil and we’re going to draw on the edge around here so that we’re making a little box to put our lines inside and it doesn’t have to be really straight. It can be not perfect – there’s no art person that’s going to come and get us if we do it wrong. It’s pretty hard to do art wrong. You have to really work at it to do it wrong.
So, we’re going to do vertical lines and you can draw them really close together. Or really far apart, but I want you to try to fill up your entire square with lines and all the same line. All of these are the vertical lines. Or if you turn it the other way of course these are the horizontal lines. So, I want you to do two of these pages so one is vertical and then one is horizontal. And then I want you to do one that’s diagonal. So, you can see here I’ve done a diagonal and the easiest way to do the diagonal you make your box and then draw your first line right across the center from one corner to the other, and then you can line all your other lines up with it and you know that you’re making diagonal lines because they’re all parallel. Or the same plane as the centerline.
So, we’re going to do diagonal lines, and then we’re going to do some bent lines. So, the line bends, it’s a bent line, also called an angle. You can see that as you get one bent line over another bent line, you get quite a few different sections and then one of the things you can have your children do is go back and color all these sections a different color so you can have bent lines that go every which way, but they’re always bent. They always go straight down and straight over and then if you color each section a different color, you’re going to come out with a piece that’s really attractive, and kids love to color. I don’t know what there are about crayons, but even I like to color. So, if you color each section a different color – and you don’t have to color all the sections, you can leave some white – so you color the sections and you can see that if you do this in the end, you’re going to have a really attractive piece of artwork.
Then the next kind of line is a wavy line and you can see here I’ve drawn lots of wavy lines – some of them crossover each other inside my box – so I could go back and I could color each section that’s inside these wavy lines a different color. So just like we did with the bent lines, we would do the same thing with the wavy lines. And then when you get a curved line that’s so curved, it turns into a circle. So, you would have a line that curves and then another line that curves the other way and there’s sort of secret ways to make a circle. If you think of it, we’re going to have our box here. If you think of your circle as two curved lines instead of a circle, it’s easier to do it. It’s always hard to do a circle – they don’t always come out round.
See if you think OK, I’m making a C. And now I’m making a backwards C. And there you got your circle. And if you want to do an Oval, you do two straight lines. And then you do your curve line at the top and another curve line at the bottom, and then you’ve got an oval and you can see on my sample here that I’ve got stars as well as my circles and ovals. And there’s a trick to doing stars so you can do three points. And then you connect the points, the dots. And then you can do three more points and connect the dots. Now you have two triangles – one upside down, one right side up – and then you’ve got a star, but that’s a 6-pointed star.
So, if you wanted a 5- pointed star you just go around your circle and you make five dots like that and then you say, OK, I’m going to connect these dots. I’m going to go over here. Down here. Up here back to this dot and then back to the final dot and you can see now I’ve got my 5 pointed star and that was pretty easy to do because you’re just connecting the dots.
So, once we have all our papers done and everybody has done as many as they want to do, some people really – Some kids really get into this and they want to do quite a few – we want to be able to display them, and so we’re going to make a little display book and the directions for doing this are going to be on the website so you can download them. It’s pretty easy to do.
The first thing we’re going to do is fold our long piece of construction paper. Exactly in half, and this is called a hotdog fold and I bet you can figure out why it’s called a hot dog full because it’s long. And then we’re going to take our open peace and we’re going to fold it up about an inch. going to fold it up about an inch all the way along. So, this is kind of hard to do. It’s really easy to get one end real skinny and the other end real fat.
So, one of the things that you can do if you have a problem is you can actually fold it around your ruler. Most kids have a ruler and that will help, a little ruler. And then we’re going to fold the other side exactly the same way. So that we’re folding it up about an inch and you know we’re not measuring this – it doesn’t have to be exact. So, we’re going to take our entire piece of paper and we’re going to fold it in half right exactly in half. So, this is kind of hard to do because the paper’s kind of stiff, but you can do it. And we’re going to take our edge that’s still cut and we’re going to fold it back to the outside. So, when we get done with this, we will have folded both edges back to the middle. On the outside, so that everything looks like a W. So if you hold it up like this, it looks like a W. And then if we stand it up you can see that we have little slots that we can put our drawings in.
So, this is a nice display book that you can put your drawings in here and you can display it on both sides of the book so you can turn it this way and get another set of drawings on this side and then you can leave these on your desk or put them around the room or run them all down the hallway. I mean, there’s just lots of things you can do with a display, so if you hook everybody’s display together, you know, that’s quite a long display. I guess we should use this bent one. So now you’ve got your book that you made. And of course, if you want to fold it up, you just go like that. And you’ve got your book. So, kids like to display their work, and this is a really simple, easy way to be able to do it.
So now talking about more lines, there’s another project that you can do with lines. I got this from a book on stuff to do with children, was printed in 1997. 100 years ago, practically and it’s called dinosaur bones, and the book was called Art projects by design. And so, what did is they took a narrow piece of paper. I would just fold a piece of paper in half like this so that you have a narrow section. When I was doing my display, I actually folded it so that you could see the middle of it.
And what we’re going to do is we’re going to talk about dinosaur bones. And when dinosaur bones are buried in the ground. They’re petrified and so they turn into rocks, and so they’re in different layers of the ground. So, depending on how old they are, how far down they are, we have these different stratas. So, you start this project off by drawing wavy lines across your paper. So that you get a wavy line here like this. Maybe one here like this, so that you’re sort of sectioning your paper off like this, and then you can go back, and you can say, well, I want to put my dinosaur bones in this one. So, here’s my bones. And maybe this one you can see here dinosaur who’s maybe got his eyes and his nose. And then here’s his bones for his body, his backbones. Of course, when you find dinosaur bones, you don’t find all of them, and because they’ve now turned into rocks, they’re very, very heavy. And so, when you see these dinosaur bones in a museum you say gosh look at those, how did they get those up in the air like that? Because sometimes these dinosaurs that you see are 30 feet high and you look up at that dinosaur. And you think wow, look at those teeth. I’m glad I’m not meeting him in a dark alley, a really scary dinosaur. So, when you think that a dinosaur bone that is about this big and weighs as much as your car. How do you think they actually get those dinosaur bones up in the air? How do you think they put them together? It would be too heavy. So, what they really do is they make a replica of the bones. So even though it looks like the real bones, it is just a pretend bone made to look like the real bone because the real bones are far too heavy to put together and put up in the air.
And there’s a museum that I’ve actually been to in Drumheller Alberta, in Canada, where they make these replicas an all across the back of the museum, they have a great big window so you can watch them making a cast of the actual bone, and then they fill it with something that’s lightweight. It looks just like the dinosaur bone, but it’s not the bone. It’s very, very lightweight so they can put it together.
So now back to where drawing we’re going to make marks in each one of these sections that don’t have the bones in it. So, we can say OK, this strata are – do we know what strata means? Strata is a word that kind of means sections, and it means sections that are one on top of the other, like sections of the Earth. So, there may be some rocks here. You know you can make it any way you want, that’s the good thing about artwork is you can do whatever you want. I guess this could look like little dinosaur bones, but I think it’s really too small. I think these are just maybe little rocks or just maybe little dots. So, you can see you can do each section differently and then when you get all done you can color them. Here’s our tree. So, we know this is the top. This is our land because we’ve got trees and grass. We’re not going to find that under the ground. Unless it’s more petrified trees and grass. So, we’re going to do this in with a black marker, and then of course we can color it and so we can color our tree green and make each one of these sections of different color, and probably the bone, should all be the same color, and they could be white. Or because they are dinosaur bones maybe we will make them all blue. And then we can say, oh gosh, my dinosaur bones are blue. So, this is a really fun project, really easy to do and kids love dinosaurs. It’s just a really amazing thing how much they love dinosaurs.
Another thing you can do with lines, is you can take two hands of two different people and you put one hand down, draw around it, then you put the other person’s hand down and draw around it and then you can take your black marker and you can mark these lines off on here. In any way you want to – I’ve done these in just big lines that are circles or curved lines. And then the lines on this other hand go the other way. So, some of them are going to crossover.
And where they crossover, they’re going to make a mark and then of course you can color each one of these marks a different color. So, you can see when you get done, you have two people’s hands together – two friends – and their hands are all beautiful colors, different colors. So, there are a lot of things you can do with lines.
The other thing that I do with lines that I think is very fun for kids – even kids as old as 6th grade like to do this – and it’s like a Simon Says game. I call it Archie the Artist and what I do is I take all the kids – well sometimes in the room, sometimes on the hallway, it just depends on how much room there is – An we do a Simon Says game and so it’s like Simon Says or Archie the Artist says – make a horizontal line. Archie the Artist says – make a vertical line. Archie the Artist says – make a diagonal line. Make a wavy line. Oh, wait a minute – I forgot to say Archie the Artist. So, if you moved and made the wavy line you’re out and you have to sit down. So, this is a very fun game. Kids will remember this if doing it with their body. When they do it with their body they remember. So, remembering is a good thing.
And again, all these lesson plans will be on our website, so you can download not only information, but you can download how to do these things. The diagrams will be on there and we hope that you enjoyed our lesson online. Thanks for coming.
Discover More Fun Art Lessons With Golden Road Arts
Watch more of our online art lessons and discover your creative passion. Golden Road Arts is a non-profit 501(c)(3) organization, and you can make a donation or purchase something from our online art gallery to help us continue providing more free art lessons.