Thanks for joining us for another free art lesson from Golden Road Arts. In the last lesson we discussed printmaking techniques in the classroom.
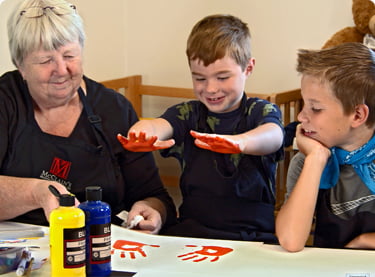
In today’s video, we have part two of Barbara Mason’s printmaking presentation from the OAEA 2021 Fall Conference. Here, Barbara looks at printmaking using stamps – including a demonstration of how children can create their own simple stamps. There’s also a guide to scratch-foam printing with affordable materials.
Printmaking in the Classroom With Stamps and Scratch Foam Video
Discover some of the best materials that can be used to create stamps, from yarn and rubber bands to Christmas ornaments and foil.
Materials Needed for Printmaking With Stamps
- Ink
- Sponge
- Yarn
- Block of wood
- Rubber bands
- Duct foil
- Christmas ornaments
- Glue
- Scratch foam
- Poster paint
Discover Simple Printmaking Techniques for the Classroom
Follow along using the video transcript to see how Barbara Mason helps children create unique designs with stamps and scratch foam.
OAEA 2021 Fall Conference: Printmaking in the Classroom Part 2
So almost anything could be a stamp, you know. I have a big stamp collection of stamps that I bought over the years and I can certainly bring it with me and come to your class it’s very fun for kids. But the other thing is you can take anything and make a stamp. So this is a stamp right here, and I found the best way to get ink onto a stamp is to do it with a sponge. You know you can put ink out and dip the sponge into it and get it on your stamp right away. If you go to put the ink on the stamp it just doesn’t work as well. So this is just poster paint.
And you know as a species we like repetition, so when you can do something and repeat it over and over again, we really like that. This is just yarn and a block of wood, pretty simple. And this is a similar thing; these rubber bands. I’m all for doing things as cheap as possible. You know, so often artists are asked to, you know, you can do this but you gotta get your own supplies. You know we’ve heard that story before.
This printed a little cleaner than the yarn. Attendee says “I think would be interesting to do like an 18 by 20 and then do one color then turn it and do another color.” Barbara responds “Oh yeah, you could do some amazing things with this and this is just very very simple. You know and anybody can do this; this is very easy to do. And then this stamp is made with a piece of glue foil. They use it for (where’s my sample here). They use it for wrapping ducts, so it’s duct foil, so it’s sticky back so you just peel the back off and stick it to your surface.
Attendee asks “So when you apply it you just kind of try to create some texture? Barbara answers “I don’t even worry, well yeah, I just kind of wrinkled it a little bit.” Let’s see how it works. You know sometimes I do these things that I think are going to be really great and they aren’t, they don’t work. I will assume this is gonna work. Let’s push a little harder. So you can get texture with lots of stuff. Yeah, you can just get a jillion things; I mean it’s not too amazing but it’s interesting. And then this must have been packaging for something we got and I so of course immediately – you know as an art teacher you immediately think what can I do with that; you know what can I do with that, that is so cool – how can I make that into something I can use. And so you say well what if I just… Attendee comments “Cause you can reduce that too. you can take that and just keep clipping away.” Barbara responds “Exactly and it was a big long piece I just cut a chunk off.”
And then the other thing I found, these are Christmas ornaments and this was just in my stuff. And so this year – before then I didn’t do it – but this year I glued it to a piece of wood. So I glued these with tacky glue and I glued these with wood glue. I’m just gonna lay these out here so you can see him. So this was an ornament. This whole thing came in a package and it was I don’t know if it was; I think it was at Michaels. And I got all these pieces out of this one package so you could see all the fun stuff you could make here. You know there’s a little house and all these different trees. And then this is something that was a couple years ago and I found this in my stuff, these little ornaments. So it’s the same kind of thing you just put the ink on.
And then this was a piece of scratch foam – insulation foam – that’s you know how they have that little stuff on.
So here’s my little stamp here with my (and then I get another piece of paper here for this) so we’ll have to print our scene with all that stuff but I just thought this snowman will be really cute. I don’t know about a red snowman. But, so, look at that, isn’t that fun and that’s so easy. Attendee ask “is that just foam?” Barbara responds “It’s just a piece of, you know, like packing foam, that thin packing foam. And then of course you can use this; this was something that came off of a food container. It came like that so of course, immediately I said could I have that container?
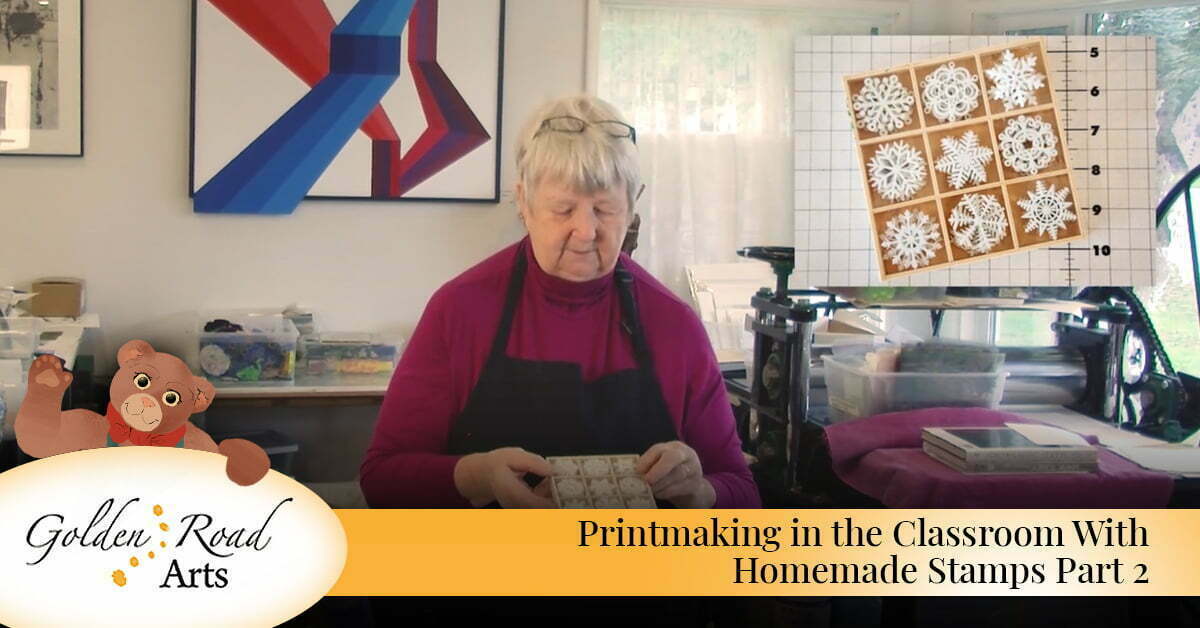
Yeah, the other thing that I did and I haven’t actually tried these yet (which you shouldn’t do a class or you haven’t actually tried this stuff) but these were other things that I got; these were little buttons. Let’s see if those work, little snowflake buttons.
And I just glue them with wood glue to this. It’s very handy to have a wood sculptor in your garage. You can just go out and say could you cut me something that’s round that I could use. Yeah, so it’s really helpful to have somebody that can do that for you. You could do it yourself but, so these are as I said, these are buttons. I just got these at Joann’s so they weren’t anything too exciting. And this was a whole package; this is a whole package of these little gingerbread men. Yeah they would, I mean it’s just it’s very very easy, very simple and there was about 50 of them in the package so you could make a lot of – yeah, you could put a whole bunch of them together. So I’ve got all my different sizes of snowflakes here, and then the other thing that I did that I had that I was gonna show you…so last year this was a $3.99 and I saw these on at some craft store – probably on sale ’cause I always buy everything on sale – and I thought oh look at all those little tiny pieces, boy those would make great stamps. So there’s like, I don’t know, probably 10 in each one here; all these different little snowflakes. I should take it out and see if there’s maybe six in each one. They’re just little spongy ones, so this is the same idea. So you can see almost anything can be a stamp. And this one I’ve got two is a double; two for the price of one.
So one printed, one didn’t; maybe we need a little cushion under to print it better. So you can make anything a stamp. And then the other thing I wanted to show you was scratch foam printing and everybody has done that; where you have drawn on a piece of it’s called scratch foam. But you can also get it in sample trays from Safeway, you know, they put package meat in it. And at the dollar store – look at this – I got it all these foam trays and all these round ones and these were each a dollar, so there’s 40 here and 30 here, so it’s quite a few foam trays for a dollar. I don’t think you can buy the scratch foam that cheap, so this was a good deal. You just have to, you know, cut them apart.
But this is one that somebody did in one of my workshops and so I just thought it was cute so I saved it, so I’m going to print that one for you. So what I try, what I tend to do – let’s see we’ll just get a little I poster paint here and will use it – what I try to do when I’m working with kids is I try to line up is like three choices of colors, or four. And I have the brayers and I roll out the ink and I hand them the brayer and I don’t let them roll out the ink ’cause if they’re rolling out the ink pretty soon they’re they have it all over themselves, all over the table and they have this big mess. And so I’ve just found that if I just give them the brayer then they roll it on this stuff and the mess is way less. It’s much more controlled, which is what you want because, you know, kids are basically pretty messy. And this is just poster paint, this isn’t anything fancy. Yeah this is just tempura. So I’m going to do this same thing in different ink so you can see how different it looks and different stuff. And yet you notice that I’m not getting ink anywhere but on the stamp, but I’ve been rolling ink out for 40 years or so. When the kids do it believe me it will be everywhere. So I try to have them work on a you know, a big piece of plexiglass so I can just wipe it off.
So the way you do this is pretty simple, you just push on it; it’s pretty hard to do it wrong. And here’s my printing press. And of course, because this process reverses – all printmaking process reverse – you don’t want to do words. I mean there’s a way to do words. So, that’s pretty light; let’s try a different ink and see what we get.
I’ll do the same color with the (anything in here, this feels almost empty) got a nice I’ve got a nice package here with nothing inside it. I was gonna try to do a light color. And then when I’m when I’m working with a whole class of kids I just take these after they print it – sometimes they wanna print it a couple of times sometimes they want two colors (that’s always hard ’cause you know you’ve gotta roll it out together, so when they want two colors I say well maybe…just depends on my mood, usually I say no.) So we can roll this ink out. This is a Speedball block printing ink. This ink is water-soluble. That doesn’t mean it’ll come out of your clothes; the pigment is still pigment. So I have done these; this very same process using both warm and cool colors, with a class, and we did it on little pieces of this – this is a like a 2.5” x 2.5” block – not very big. And we did pieces that were just a little bigger than this out of fusible iron-on Pellon. So what we did was we printed it on the ink -warm colors one day and cool colors on the next day – and we printed it on these little pieces of fabric and then all we had to do was iron them onto a big piece of material and make a giant banner. It was very fun for the room. The other thing you can do (one time I did this, I don’t know what got into me to do this project, it was a huge project) I worked with three sixth grade classes at Springville; it was a brand new school at the time. And we actually got a grant from RACC to do it which was great ’cause it paid for the materials. We cut out foam core the shapes that we wanted and the whole thing was on the Tillamook forest, and saving the forests. And so the kids did this really elaborate thing where they planned what they were going to do and then they cut out all the stuff and then we actually printed it on fabric. And then my sister, being the wonderful person she is, sewed these things all together so we had these banners that were like 6 feet tall that they hung in the school and each one on kind of a section of the forest, you know, in preserving it and everything. And then they actually hung some in the forest in their center at the Tillamook Forest so that was a big thing for the kids; they were pretty excited about that. And it was a big project, it took about six weeks. I’m too old to do that again. I don’t want to do that again, but it was very fun. I really enjoyed doing it.
So, as I said this is very easy to do. You just draw on this stuff; I usually use a dull pencil works pretty well. If you use a pen the pen will work but it’ll print the first couple times that you print; the ink will come off so a dull pencil works better to draw on here. And you can see this isn’t very deep; let me wipe this off and I’ll just hand it around so you can look at it. I just dump these when I’m working with the class. I have a bucket of water at the end of the table and when they’re done printing then we just throw them in the water and then at the end I clean them up. If they want them, you know, sometimes they want them, sometimes they don’t care. If they don’t care then I use the backside next time or somebody else but if they want them then, you know, of course, I’ll let them take it. So you’re welcome to see how it’s not very deep but you can see that it worked pretty well. Yeah, so it’s just a very quick little a quick little drawing with a really good result. I know this came out pretty well.
Free Art Events for Kids in Oregon
At Golden Road Arts, we provide free art lessons and art events for children in Oregon schools, libraries and other locations. If you would like Barbara Mason to provide an educational art event, call (503) 718-7097.
Golden Road Arts is a 501(c)(3) non-profit organization. To support our free online art lessons please consider making a donation or purchasing from our online art gallery.